

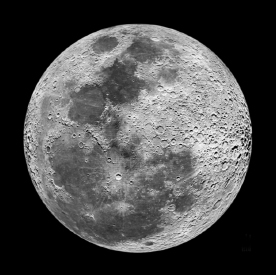
Moon – NASA
In most cases when we photograph a scene at night, if the moon is present, it renders as an overexposed and elongated sphere. It doesn’t look anything like what we see in real life. It renders as a nondescript elongated circular blob. This is most likely due to at least two factors. The shutter was set way too slow and the aperture was open way too wide.
So, how do we take a photograph of the moon so we can see the details?
If you think about it for a second or two, you might realize that the light hitting the moon is the same brightness and intensity of the light from the sun that we on Earth experience during daylight hours. That fact and the atmospheric condition of this planet implies that to take a picture that will render the moon as we see it, with all of the surface details, requires an exposure somewhere near a good exposure on Earth during daylight hours.
In most cases, we would want to shoot at an exposure that we would use in earth daylight. As example, if you shoot at a setting of ISO 100, the exposure would be 1/100 of a second at f/ 16 or an equivalent.
Using the daylight rule for exposure for a given ISO setting, we would set the shutter speed at a setting nearest to the numerical value of the ISO and use f/16 as the aperture setting. For example, if using ISO 100 set the aperture at f/16 and the shutter at 1/125 and check the image after shooting. To insure that the image is even sharper, set an equivalent exposure of f/11 at 1/250.
It is a good idea to bracket ½ to 1 stop up and down, but you’ll more than likely be using that first exposure.
Keep in mind that you’ll need to shoot the moon with a shutter setting of at least 1/60th or faster to get a sharp image. The moon moves pretty fast through the viewfinder. If you wait too long, you’ll have to reposition the camera to keep up with it. Assuming you are photographing a rising moon, you should anticipate the movement by setting the camera up with the moon at the bottom of the viewfinder. Get everything ready to fire the shutter when it reaches the point in the shot where you want it to be. Once it gets into position, shoot it.
All of the above assumes that it is a clear night without haze, the moon is high and bright, and you are working from a sturdy tripod.
Your best bet will be a long focal length lens of at least 200mm to 300mm or longer. The longer the lens the faster the moon will move through the frame and the faster the shutter speed needed to shoot a sharp image.
Yes, the f/16 rule works with the moon too!
While this method will produce a beautiful detailed moon, it will not properly record any earthbound objects you might want to include in your shot. They will all be way underexposed by the fast shutter. However, you can shoot the nighttime landscape separately and dub the moon into the image using Photoshop.
To get the most information out of your attempt, you may want to use HDR software to carefully blend your bracketed images in order to reveal more details in both the highlight and shadow areas of the moon surface.
You can read about my book “Rethinking Digital Photography” here.
Please have a look at some of my other posts here.
NOTICE of Copyright: THIS POSTING AS WELL AS ALL PHOTOGRAPHS, GALLERY IMAGES, AND ILLUSTRATIONS ARE COPYRIGHT © JOHN NEEL AND ARE NOT TO BE USED FOR ANY PURPOSE WITHOUT WRITTEN CONSENT FROM THE WRITER, THE PHOTOGRAPHER AND/OR lensgarden.com. THE IDEAS EXPRESSED ARE THE PROPERTY OF THE PHOTOGRAPHER AND THE AUTHOR.
