

DIY String-pod
Handheld HDR is easy with this homemade contraption that you can easily make yourself using next to nothing.
HDR requires a series of images that are shot in sequence. If you are not careful, you can ruin the exposures due to camera movement. I am usually pretty successful as long as the shutter speeds are fast and the shots are fired in quick succession. However, the chances are, my camera will move between the exposures especially at longer intervals, which can cause a number of problems including misalignment and blur.
An old rule of thumb states something like the following. Any shutter speed that is slower than the focal length you are using converted to a fraction of a second and then rounded to the closest shutter speed setting should not be used for hand held shooting if you want sharp pictures. Using this as a guide, a lens that has a focal length of 135 mm should not be used handheld at speeds slower than 125th of a second. A 300mm lens should not be used at speeds slower than 1/500th of a second.
That concept usually worked for 35mm cameras and full frame digital sensors. However, the shutter speeds would need to be somewhat faster for smaller sized crop sensors as the focal lengths mentioned above would produce a much longer focal effect and therefore a higher magnification of potential blurring.
When handholding any camera, you may also need to consider other factors such as your own ability to hold the camera steady, wind, standing in a precarious situation, etc.
When shooting HDR, it is usually the shutter speed that creates the difference between the exposures. A sequence usually means at least one shot at a normal setting and several shots that are shorter and longer in exposure time. The longer settings can cause the exposures to blur.
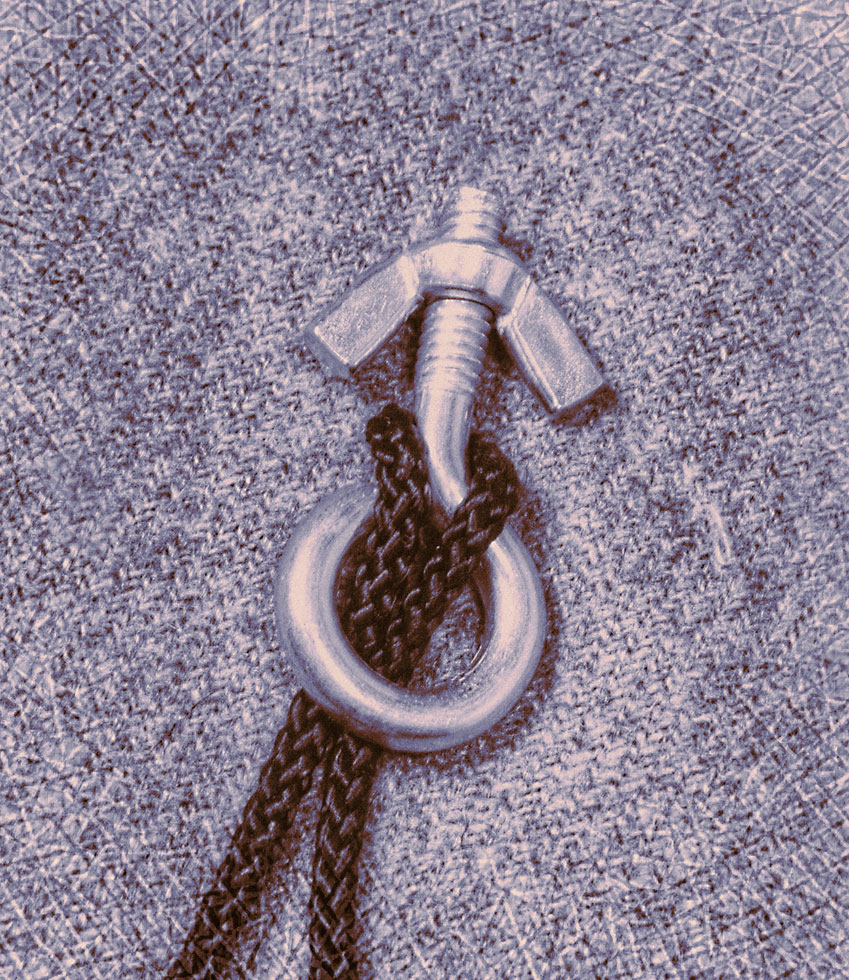
String-pod – © John Neel
The device shown here is called a String-pod. It can be an effective tool to help steady the camera during most daylight HDR sequences as well as exposure times that are a bit longer than what would be used for a normal handheld shot. I have used it for shooting video as well.
Basically, there are two ends to this thing. One end attaches to the bottom of the camera using the eyebolt and the other end sits on the ground.
To use it, you simply step on the bottom piece while applying an upwards force on your camera. the amount of force is just enough to make the string taught. The upward pressure should significantly help to stabilize the camera. This device can allow you to shoot at slower shutter speeds than suggested above. If your shutter speeds happen to be a bit slow at the bottom end, you may find that your images will still be useful.
While this tool can make your walks in the woods a bit lighter, I would recommend a tripod if you know that the light level is going to be low. A tripod is always a better choice for low light photography.
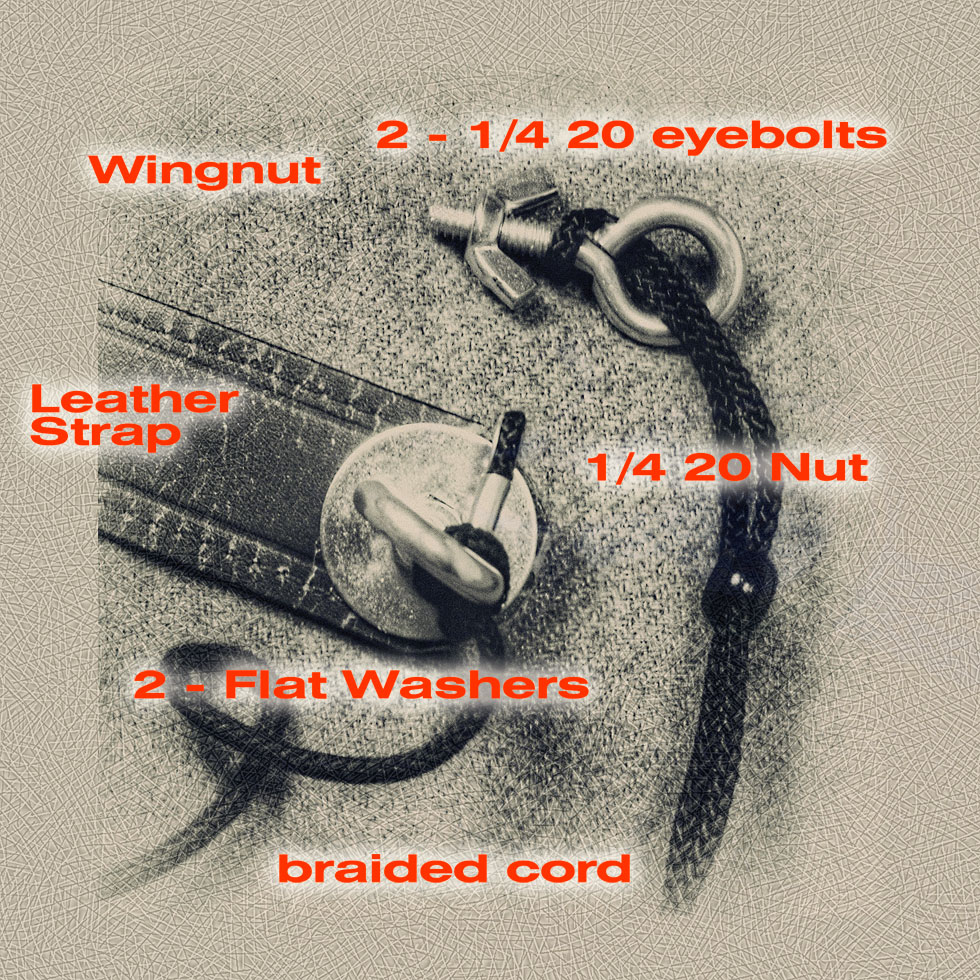
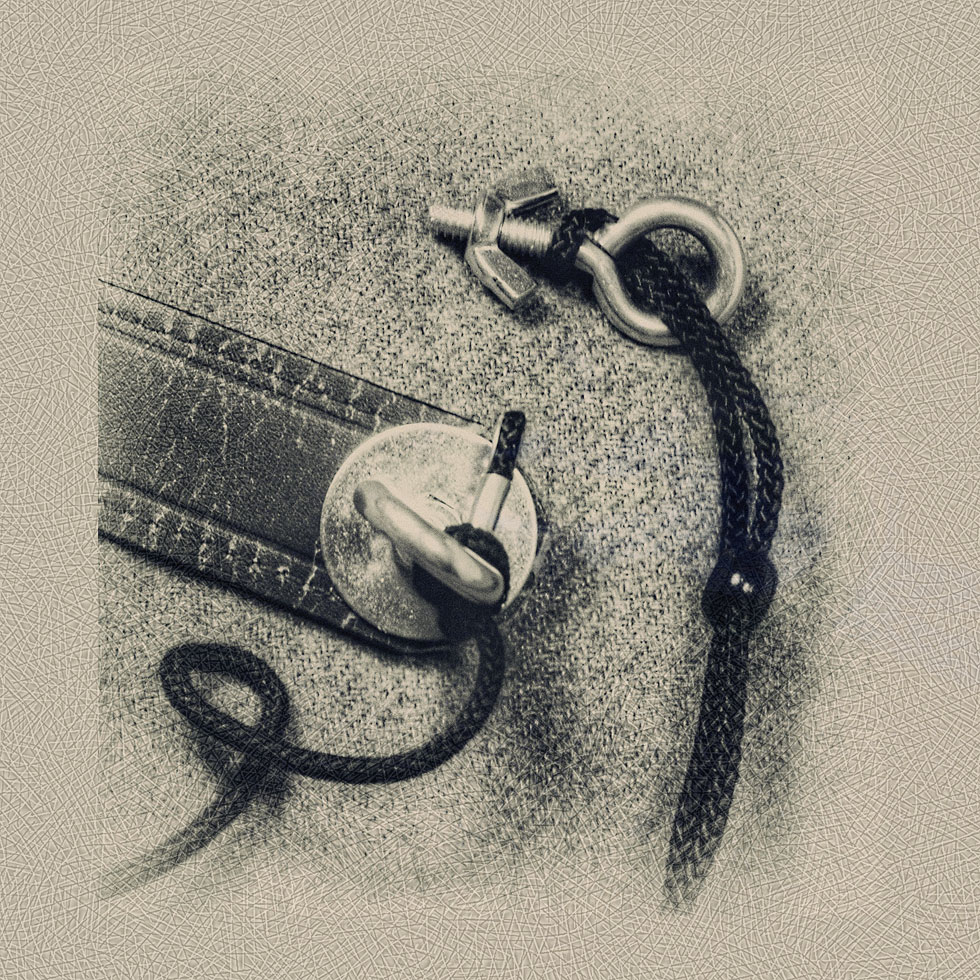
DIY String-pod parts – © John Neel
Basically, all you need are 2 -1/4 20 eye bolts, a 1/4 20 wing nut, a 1/4 20 nut, 2 flat 1/4″ flat washers and a 6′ +/piece of (1/4″ approx) braided rope. I also suggest a piece of leather strap as shown to give you something to stand on. You can use anything else that you feel would be appropriate such as a small piece of wood. The string or rope used should be strong enough and should not stretch when pulled. You will need to make a hole in the leather or whatever you use on the foot end. Feel free to make your own customized version. The one shown uses several old point and shoot camera straps for the string and a portion of an old belt to stand on. I like the belt with the bolt as it can dig into the ground or pavement for a better grip.
Another option might be to simply tie a noose at the bottom of the string to act as a foot strap.
The idea, is to keep it simple.
In a pinch, an eyebolt and a piece of string will suffice. If you don’t have an 1/4 20 eyebolt, simply tie the string around the camera at one end and step on the other end with your foot.
You should use some caution when attaching the eyebolt to the camera. Be very careful not to screw it in too tight as it can damage the camera. It only needs to be screwed in enough to keep the stringpod attached.
I usually carry one in my bag just in case.

This is a poster that I created for the WPPD event.
This is a poster that I created for the 2014 WPPD event.
Get a 2014 WPPD poster here: 2014 Worldwide Pinhole Photography Day – Promo Posters
Rethinking Digital Photography – John Neel
My book – Rethinking Digital Photography
Read about more great photographic techniques in my book Rethinking Digital Photography.
NOTICE of Copyright: THIS POSTING AS WELL AS ALL PHOTOGRAPHS, GALLERY IMAGES, AND ILLUSTRATIONS ARE COPYRIGHT © JOHN NEEL AND ARE NOT TO BE USED FOR ANY PURPOSE WITHOUT WRITTEN CONSENT FROM THE WRITER, THE PHOTOGRAPHER AND/OR lensgarden.com. THE IDEAS EXPRESSED ARE THE PROPERTY OF THE PHOTOGRAPHER AND THE AUTH
