A pinhole calculator is used to help you find the correct exposure for your pinhole camera. They are usually very simple to use.
Pinhole calculators come in a variety of forms. Manufacturers of pinhole cameras sell various analog versions. If you make your own, as I do, you’ll need to find a way to calculate the exposure.
Fortunately, there are online versions as well as downloadable applications. If you like, you might be able to find an app that will run on your smart phone or iPad. I happen to like PinholeCalc from Concept House.
PinholeCalc is a tiny app that runs on a Mac. It is easy to use and it is free. My version is running on one of my older systems. I’ve listed a few others at the end of this article, but it shouldn’t be difficult to find others that will run on your device or computer.
Every pinhole calculator requires some input in order to produce proper exposure information.
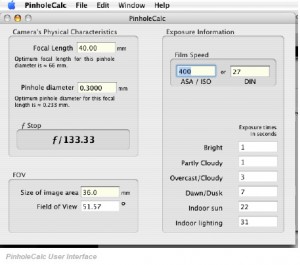
Usually, the camera’s physical characteristics are input in order to calculate the effective aperture. Generally, the two important factors to input are the focal length and the pinhole diameter. These dimensions are input in the Focal Length and Pinhole Diameter boxes on the left side of the screen. In both cases, the input is in millimeters.
In order to determine the focal length, measure the distance from the front of the camera (pinhole) to the focal plane.
Note: The diameter of an existing pinhole can be measured using a scanner. I will discuss how to do this in a future posting.
Note: The pinhole calculator will also provide the most optimized pinhole size for a given Focal Length camera. This information can be useful for determining the size to make the opening when constructing the camera or the pinhole aperture.
 In the example shown, a focal length of 40 mm is input into the Focal Length data window.
The pinhole diameter, which is determined by measuring the pinhole, is then input into the box. In this case it shows the input as 0.30 mm.
Hitting return after each input will update the other numbers. In the example, a 40 mm focal length when using a .30 mm pinhole yields an f/stop of f/133.33.
The calculator can also be used to determine the approximate Field-of-View depending on the sensor or film size. When the size of the image area is known and added into the input box, the Field of View shows in the bottom left. This number will vary based on the size of the sensor or film being used and only serves to indicate the approximate angle of view relative to the focal length you input into the program.
The last thing required is the ISO of the film or the sensor setting on the camera.
Once the ISO is input, the exposures listed on the bottom right, will adjust to the appropriate times in seconds.
In this particular example, you would use a 1 second exposure for Bright Sun and Partly Cloudy, 3 seconds for Overcast, and so on. These settings are guides to help you get close. I find that the settings are close enough to produce reasonable results. Once you have determined the exposures, you can simply print the resulting PinholeCalc window so that you can carry it into the field. With a homemade pinhole camera, I usually tape or glue it to the camera for a quick reference.
Once the inputs are in place, the Exposure Information is listed on the right at the bottom.
“PinholeCalc is a handy little utility that can be used to find the fstop, optimum focal length, optimum pinhole diameter, and common exposure times based on film speed of a pinhole camera. A field of view calculator is also included. This program should handle just about all mathematical aspects of building and using a pinhole camera. The art is up to you! Cost/License
PinholeCalc is freeware. You may use it as much as you like. If you would like to make a donation to our development fund then we would certainly not turn it away.
System & OS Requirements Power Macintosh running OS X v10.1 or greater.” – Source: Concept House
For those using a DSLR or a Mirrorless Digital camera – you can simply use the Aperture Priority setting on your camera to produce automatic exposures when using a pinhole lens on any camera with interchangeable lenses. In which case, the above is not necessary, but it can still provide some indication of what to expect with exposure times.
Here are links to other calculators:
Pinhole Assist on the App Store on iTunes – For the techie.
Pinhole calculator – Zero Image
Pinhole Camera Calculator – Bob Manekshaw’s PhotoStuff
I will be posting many new articles about pinhole soon.
,
Read about my book Rethinking Digital Photography.
Please have a look at some of my other posts here.
NOTICE of Copyright: THIS POSTING AS WELL AS ALL PHOTOGRAPHS, GALLERY IMAGES, AND ILLUSTRATIONS ARE COPYRIGHT © JOHN NEEL AND ARE NOT TO BE USED FOR ANY PURPOSE WITHOUT WRITTEN CONSENT FROM THE WRITER, THE PHOTOGRAPHER AND/OR lensgarden.com. THE IDEAS EXPRESSED ARE THE PROPERTY OF THE PHOTOGRAPHER AND THE AUTHOR.


