

Any bit-mapped image file can be resized to another dimension.
To understand what happens when you alter the size of a file, you need to look at the way an image is interpolated.
Before I get too far into this discussion, I should say that it is always best to capture the image as large as possible and as close as possible to the size you want to print. I almost always shoot at the highest resolution possible so that I can avoid any unnecessary interpolation up or down. The reason for doing so should be obvious once you start to understand how interpolation, or resizing of a digital file works.
Interpolation, relies on algorithms that produce a variety of results. Generally, there are only a few methods that are available within a program such as Photoshop. There are also a number of third party interpolation plug-in filters available for Photoshop and other software that can produce a variety of other interpolation methods that may produce superior results.
The following examples illustrate what happens to the pixel structure of the image with several basic interpolation methods that are available in Photoshop. Interpolation is done using the Image Size menu under the Image Menu.
The illustrations shown are enlarged screen shots showing the actual interpolated results of each method.
Actual pixels
Actual Pixels – Line # 2 above, shows actual pixels. As we all know, a pixel is the smallest increment of a digital image. There is nothing smaller. The pixels are distinct in color and size.
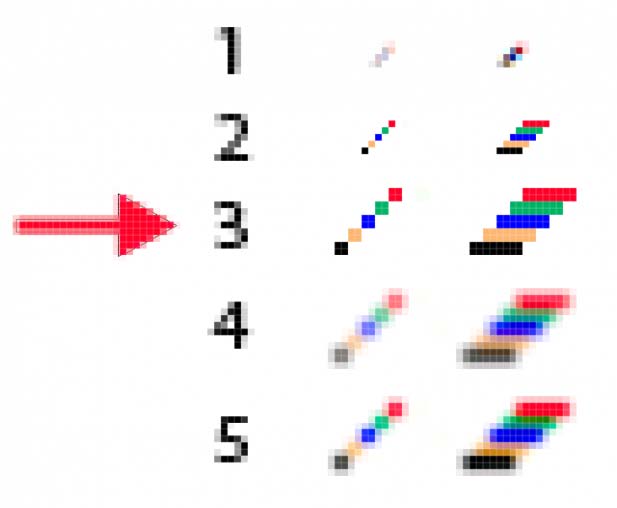
Nearest Neighbor
Nearest Neighbor – Line # 3 above, shows a 2X interpolation using a nearest neighbor interpolation algorithm. This simply produces exact copies of adjacent pixels. The resulting image looks the same as the original except that the pixel count is higher by a factor of 2. A 2X interpolation creates four pixels for every one in the original. 1 pixel is added horizontally, vertically and diagonally for each original. Each original pixel becomes four same density pixels. This method will show increased stair stepping in diagonal lines and curved shapes, which for most images is an unfavorable result.
A 4X interpolation using this same method, results in 16 pixels per original.
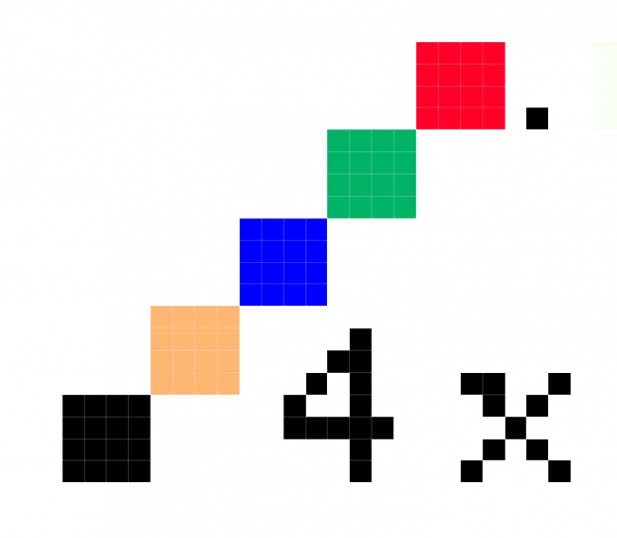
Enlarged – Nearest Neighbor
Enlarged – If you look at the enlarged Nearest Neighbor image above, you will see a black pixel to the right of the red square. This represents a single pixel. The colored squares are made up of 16 pixels each as indicated by the faint gray lines within each shape.
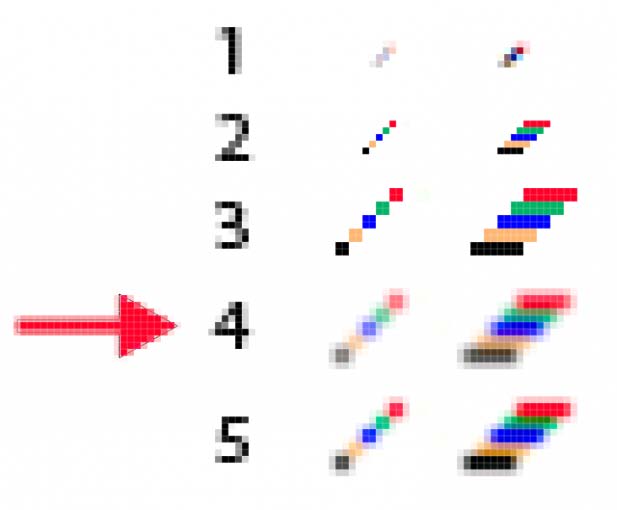
Bicubic
Bicubic Interpolation – Line # 4 above, shows the use of Bicubic interpolation. The original pixels are blended with neighboring pixels by the interpolation factor. In this case, the colors mix with the white background or with adjacent pixels. New pixel data equal to a fifty/fifty mix is added in between the original and the adjacent pixels. Notice that the original pixels are diminished in tone and contrast due to blending. The softer edges will appear less stair-stepped due to the blending of the pixels. There is a softening that also reduces the contrast on edges and diagonal lines.
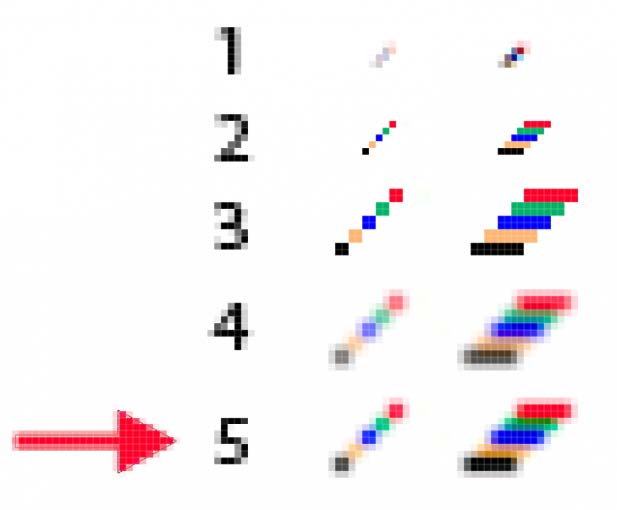
Bicubic w/ Unsharp Masking
Bicubic Interpolation with Unsharp Masking – Line # 5 above, is exactly the same Bicubic interpolation as #4 except that the pixels have been sharpened using mild unsharp masking. The sharpening helps to restore the pixels by increasing the contrast and restoring the color and therefore creating a sharper edge on curves and diagonal lines.
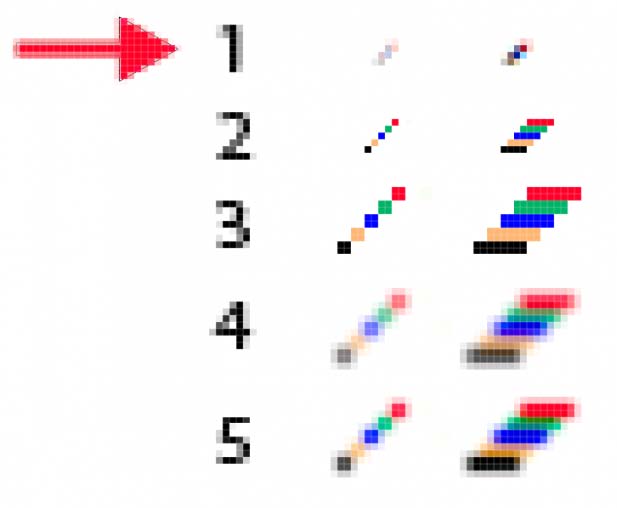
Bicubic at 50% Reduction in Scale
Bicubic Interpolation at 50% – Line # 1 above, shows the results of a 50% reduction in scale using Bicubic Interpolation. When reducing the image size, many pixels are actually thrown away resulting in a softening and a degraded tonal shift from the original pixels due to a reduction of original pixels and the blending of what is left.
When you need to interpolate an image, you should be aware of the above results. The best interpolation method for most applications is a Bicubic interpolation of no more than 2X. In most cases, anything else will compound the problems illustrated.
A note about compressed JPG or JPEG Files:
JPG or JPEG files can produce unwanted and rather ugly artifacts due to the compression and re-compression of the pixel data when the files are saved, opened and saved again as compressed files. Each iteration of saving the file with a new compression will eventually destroy the image file completely. It is advisable to never save a file as a compressed jpg unless you save the original separately as a full scale 100% jpg. The compressed file should be renamed before saving to avoid an overwrite of the original and to identify it as being compressed. A 100% jpg file retains all of the image data necessary to complete the image without producing compression artifacts.
You can read about my book “Rethinking Digital Photography” here.
Please have a look at some of my other posts here.
NOTICE of Copyright: THIS POSTING AS WELL AS ALL PHOTOGRAPHS, GALLERY IMAGES, AND ILLUSTRATIONS ARE COPYRIGHT © JOHN NEEL AND ARE NOT TO BE USED FOR ANY PURPOSE WITHOUT WRITTEN CONSENT FROM THE WRITER, THE PHOTOGRAPHER AND/OR lensgarden.com. THE IDEAS EXPRESSED ARE THE PROPERTY OF THE PHOTOGRAPHER AND THE AUTHOR.
