

Pinhole How-To
If you are a photographer but have never produced a pinhole image, I would say you don’t know what you are missing.
Pinhole is the simplest form of photography there is. It can be both educational and inspiring to make and to use. There are many photographers who have chosen it as their choice method to make images.
In preparation for the upcoming Worldwide Pinhole Photography Day event at the end of April 2014, I have decided to do a how-to post on making a very easy and fun to use pinhole camera. The camera is constructed using not much more than a roll of film, a small piece of metal with a tiny hole and a matchbox.
Made from items that are commonly found around the house, anyone can make them in no time at all.
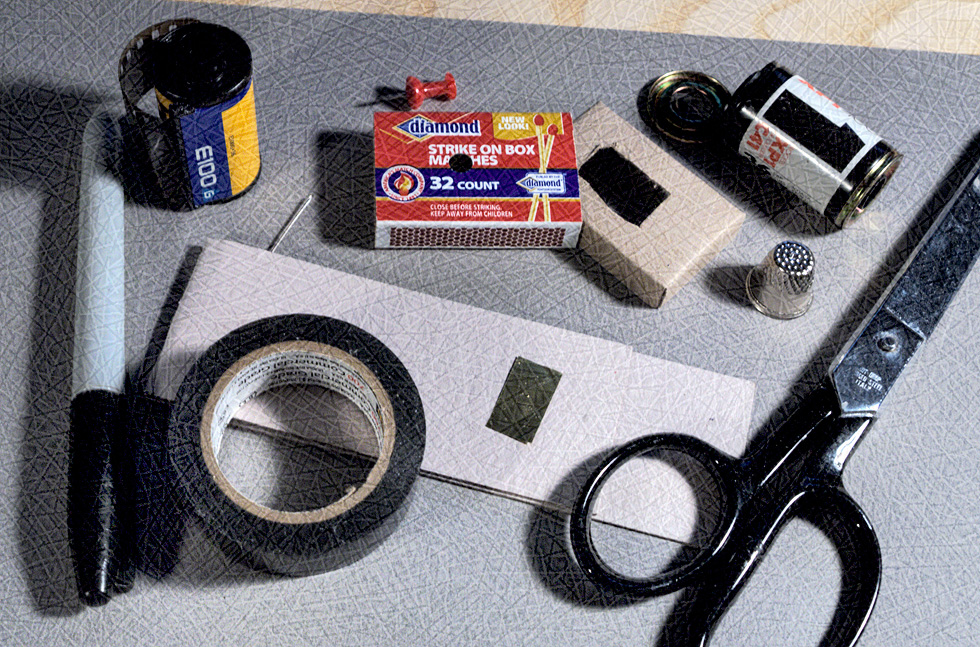
The items used to make these cameras are as follows:
- Matchbox
- A roll of 35 mm film
- An empty 35 mm film cassette/canister
- A roll of black tape (electrical is good)
- a sewing needle or a pin
- A small thin piece of metal shim (or small piece of aluminum cut from the side of a pop can)
- A large paperclip
- You may also need a pair of scissors, xacto knife, a black sharpie, a small piece of cardboard and a thimble.
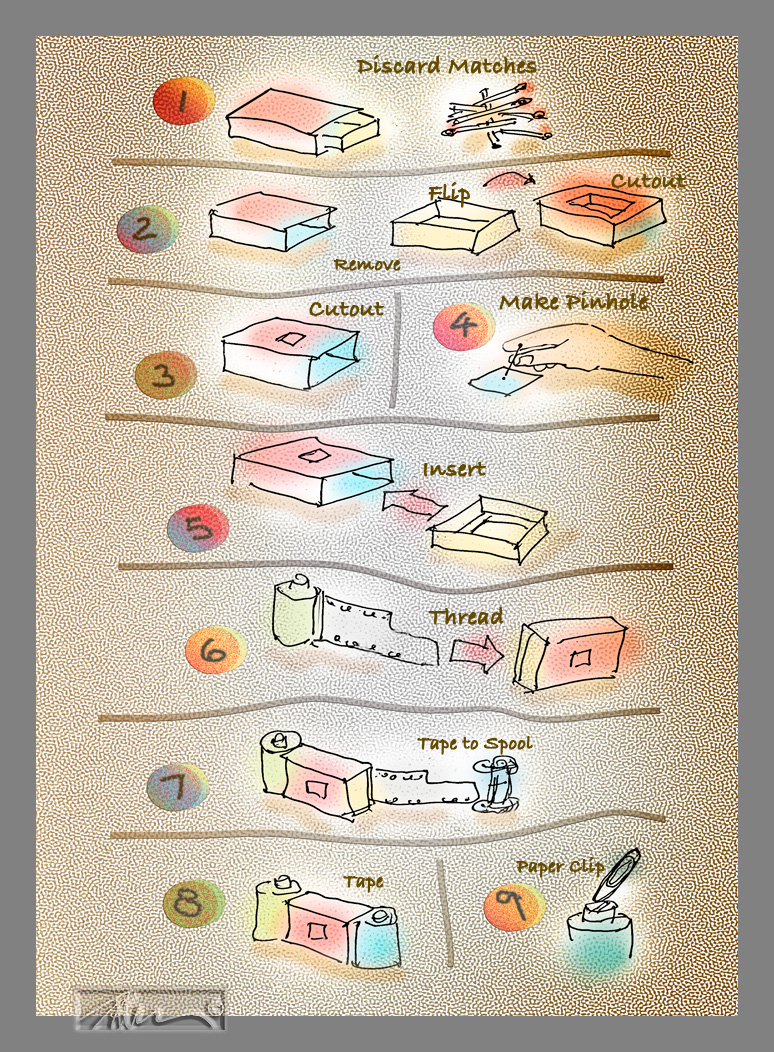
Here is the tutorial for building a Matchbox Pinhole Camera using the chart shown above:
- Remove the matches from the matchbox.
- Cut a rectangular window out of the sliding box (drawer) portion of the matchbox. This shape will determine the outer edges of the image frame.
- Cut another smaller 1/4″ opening in the outer sleeve (cover) portion of the box. This is where the pinhole will be mounted. I create mine with a hole punch.
- Prepare the pinhole by puncturing a very tiny hole into the center of the metal shim with the needle and tape the pinhole aperture over the small opening you cut in the outer sleeve of the matchbox, while leaving the actual pinhole uncovered. To punch the pinhole, Use light pressure with a twisting motion. To measure the pinhole, use the link at the end of this article for instructions.
- Slide the inner box back into the outer shell.
- Thread the film leader sticking out of the film cassette through the space between the rear of the box and the rectangular opening you cut into the inner box with the emulsion facing towards the front of the camera.
- Remove the end-cap of the second (empty) cassette. This can be done by carefully using a bottle opener or by squeezing the cassette while prying the end with the thumbs. – Using a short piece of tape, fasten the end of the film leader to the takeup spool of the second cassette. – Replace the spool and snap the end cap back onto the spool cassette and wind the film a half turn or more with your fingers.
- Add a small piece of tape to cover the pinhole. I usually fold a small piece of tape back on to itself to form a tab that can be used to pull the tape away from the pinhole for exposure. This will serve as a shutter as well as a cover to block the light when not using the camera. – Wrap tape over the rest of the camera to cover everything but the pinhole and the ends of the spools. The tape acts to make the camera light tight. Make sure that both spools are free to turn. Do not cover the pinhole.
- Insert a large paperclip into the top of the take-up cassette. This will be used to advance the film through the camera. For now, advance the film by turning the clip approximately three full turns.
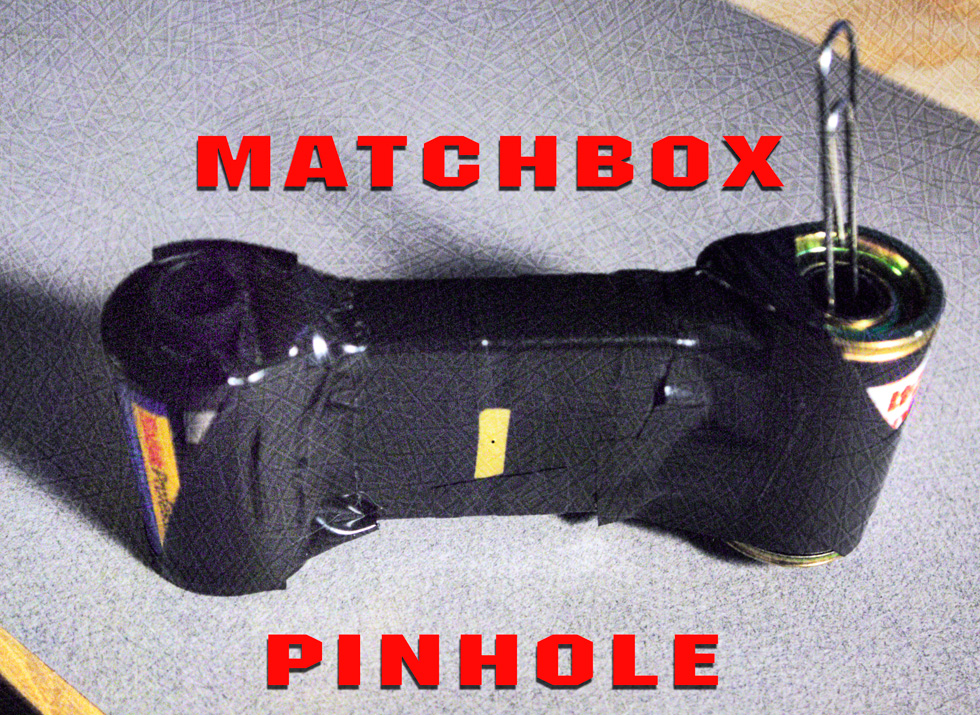
Matchbox Pinhole Camera – © John Neel
Your camera should now be ready to use.
To use the camera:
Place the camera on a supporting surface. Advance the film approximately 1 1/2 – 2 turns to make sure you have reached a point where the film has not been exposed. When you are ready, peel back the tape covering the pinhole (open the shutter) and expose for the time required. Keep the camera steady so that it does not move. Cover the pinhole back up and advance the film through the camera another 1 1/2 – 2 turns. The camera will be ready for the next exposure. Repeat the process for every image until you get to the end of the roll. You are at the end of the roll when the film doesn’t want to turn. Do not force it or you might damage the camera, causing a light leak or pull the tape off of the spool.
When you are done shooting the roll, move the paperclip to the original cassette and rewind the film back into the original cassette to have it processed. Carefully remove all of the tape wrapped around the camera and save the matchbox for another roll of film. Re-load, re-tape and reuse as above.
I will discuss exposure in a new post soon.
Here are a few other articles related to pinhole photography:
- Pinhole Photography – How to measure the diameter of a DIY pinhole aperture
- Pushing the Pinhole Image
- Skink Pinhole Pancake – HDR, Stitched and Digitally Painted
I cover many photographic topics in my book, including, alternative lenses, pinhole, natural HDR and digital painting. – Great Photography Gift Idea for the Holiday.
Please have a look at some of my other posts here.
NOTICE of Copyright: THIS POSTING AS WELL AS ALL PHOTOGRAPHS, GALLERY IMAGES, AND ILLUSTRATIONS ARE COPYRIGHT © JOHN NEEL AND ARE NOT TO BE USED FOR ANY PURPOSE WITHOUT WRITTEN CONSENT FROM THE WRITER, THE PHOTOGRAPHER AND/OR lensgarden.com. THE IDEAS EXPRESSED ARE THE PROPERTY OF THE PHOTOGRAPHER AND THE AUTHOR.
