

Part 5 – Shutter
Pinhole Shutter 2014
While it may seem a bit premature for building the shutter, I think it is good to get this piece started. Once we have this built, the next few posts will be about making and mounting the pinhole.
This is the fifth of a number of posts that will be devoted to the construction and the use of my 120 Matchbox Pinhole Camera.
Although I have built smaller 35mm pinhole cameras from regular matchboxes, I had never built one with this size matchbox until I got the idea a couple of years ago. While the first one worked pretty well, I have decided to make a few minor alterations in order to make the camera a little more durable.
So, in that sense, it will be a work in progress.
Up to this point, we have done most of the light-proofing, created a means for winding the film through the camera, and built a system to hold the film.
PLEASE READ! – As this is a learn-as-I-go project, I will not post this as a single post tutorial. I am showing you my progress in the hopes of getting you interested in the building process. In the end, you can follow through the links that will show you the complete step-by-step build. To see previous posts use the links below.
Here is where I am at the moment with Part 5:
In most ways, pinhole photography is the simplest of all types of photography. Besides a box and a pinhole, we need a light sensitive material on which to expose the image. We also need a way to control the exposure time. In the past, I have used a number of methods. The simplest is a finger placed over the pinhole. While that technique works fine for a single exposure camera, it isn’t very convenient with a camera loaded with a roll of film.
There are hundreds of DIY and commercially available shutters that can be put to use with a pinhole. A piece of black tape will usually do the job. Personally, I like to be a bit creative and make my own versions that I use for the cameras I build.
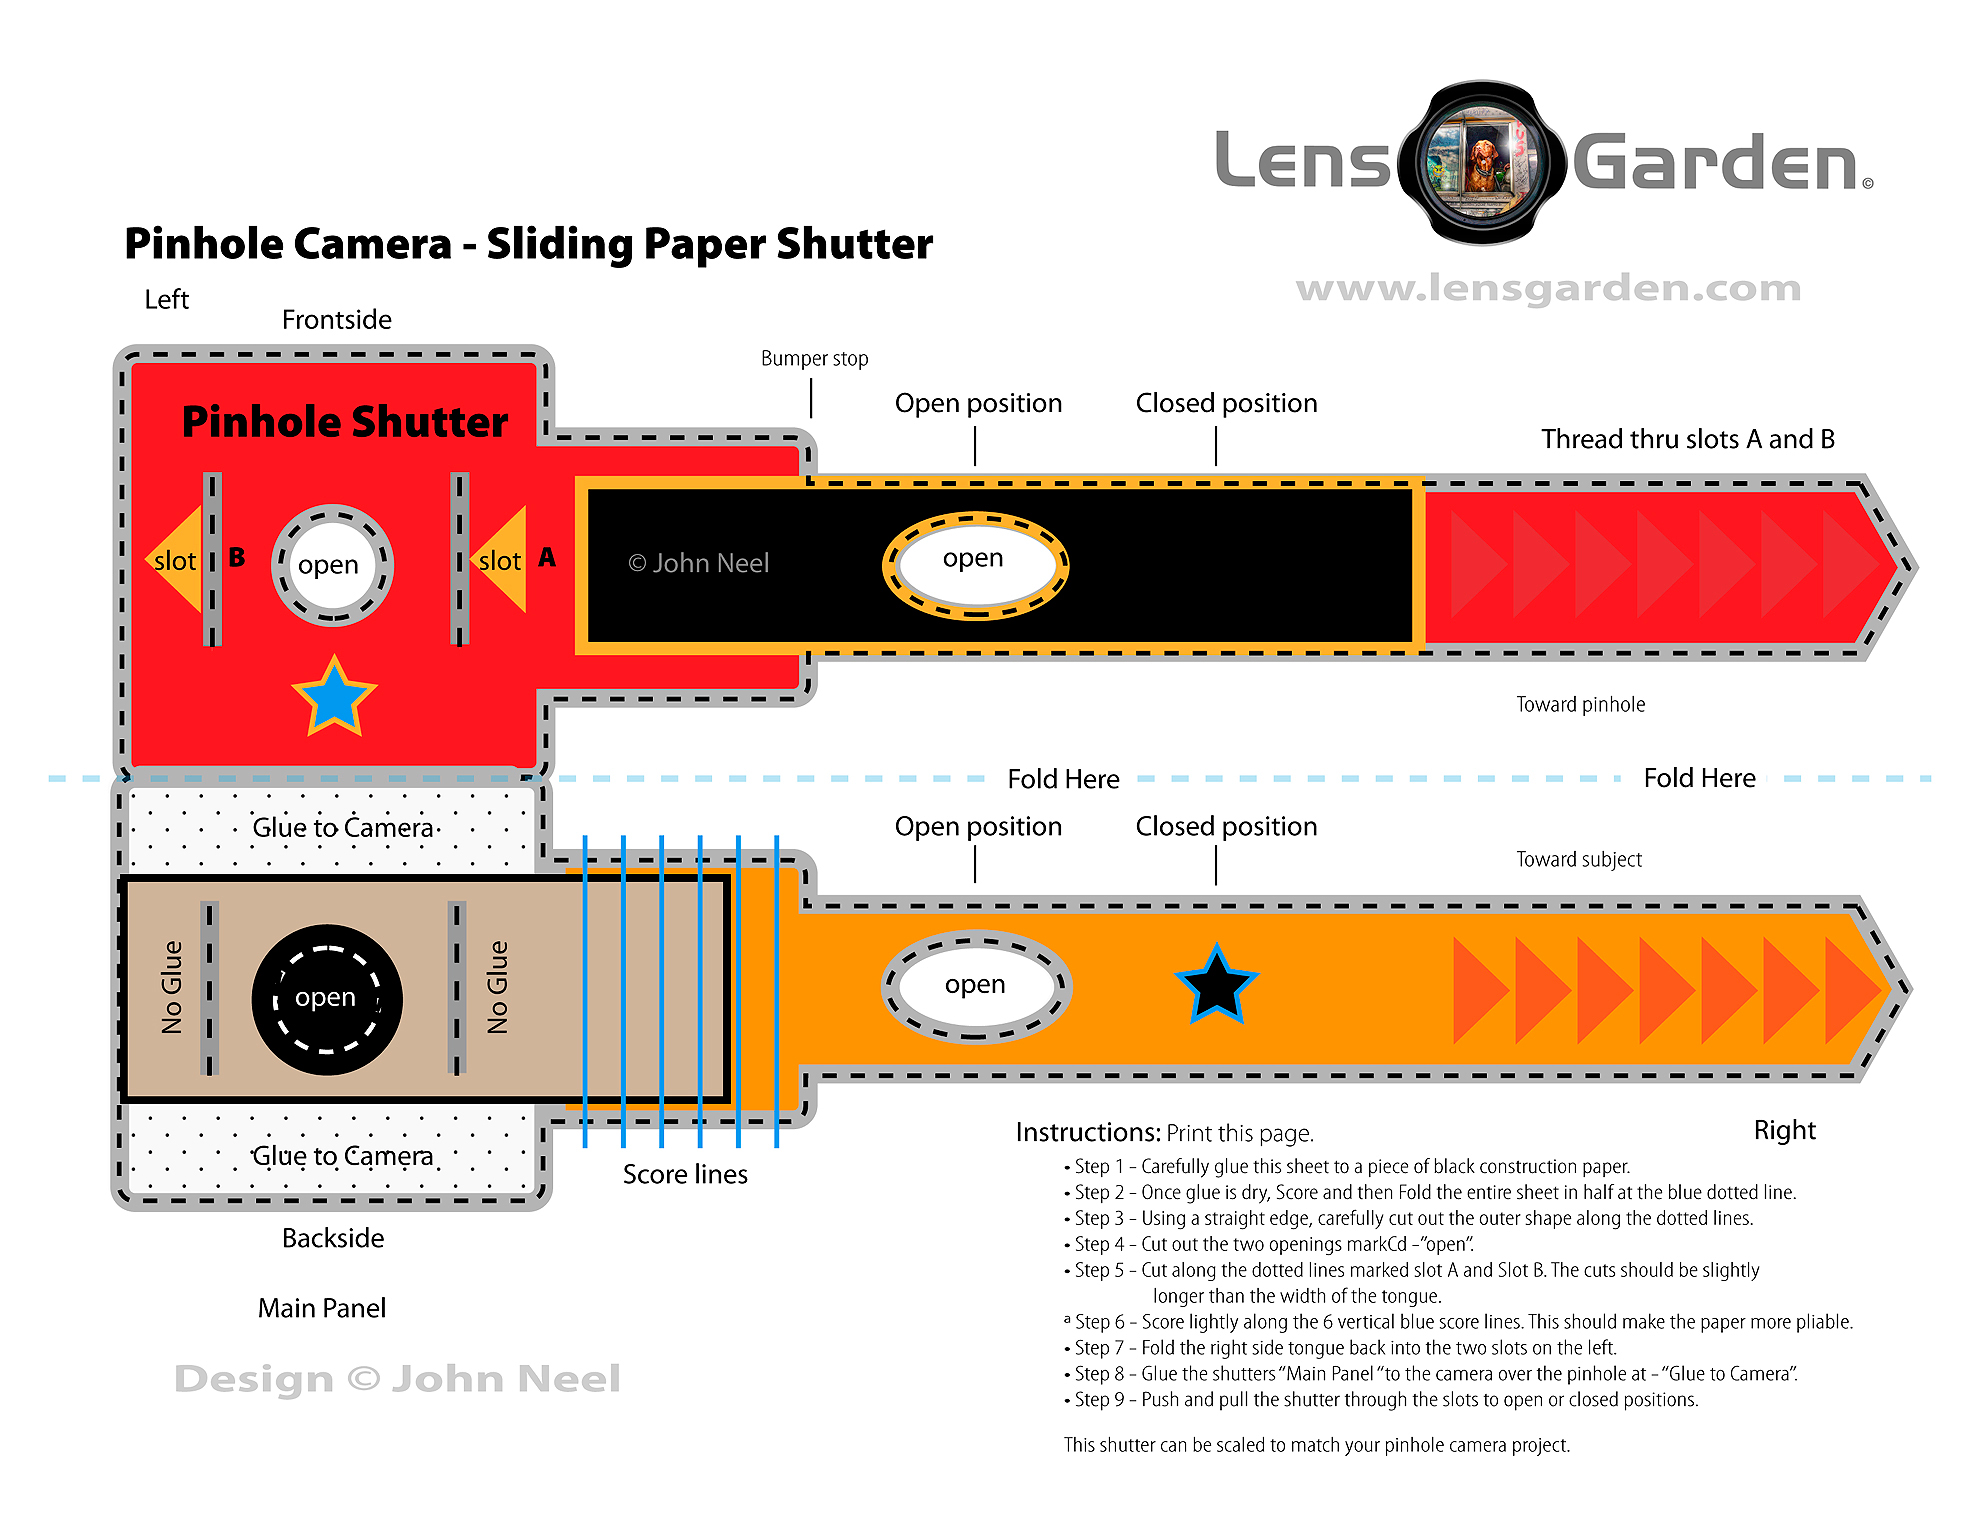
This posting contains a downloadable and printable design for a simple to use sliding paper shutter.
Pinhole Shutter 2014 – © John Neel
This is the shutter I have devised for use with the 120 Matchbox Pinhole Project. However, you may also use it for any pinhole camera you are thinking of building. I have designed it to allow for scaling up or down for that purpose. I would suggest that the scalie of the camera be considered to determine how thick the paper should be. Lighter weight paper would probably work better with smaller scale cameras and heavier paper/paperboard for larger sizes.
Notice: You are free to use the template for building your own 120 Matchbox Pinhole Camera. You may also use the template with a pinhole camera of your own making. You may not distribute this design, the image, the template or the pdf without the consent of this author. However you may provide a link to this page for others who may be interested in building their own pinhole camera. Here is the full scale pdf file: Pinholeshutter
Download the pdf and follow the instructions. Have FUN!
Note: Before gluing the shutter to your camera, you should attach the pinhole. We will cover that step in the next posting – Part 6.
Previous Posts:
120 Matchbox Pinhole Project – Part 1
120 Matchbox Pinhole Project – Part 2
120 Matchbox Pinhole Project – Part 3
120 Matchbox Pinhole Project – Part 4
We still need to create and fasten the pinhole, learn a bit about 120 film, finish the film advance, and load the camera. We will soon be finished and ready to make some images.
Rethinking Digital Photography – John Neel
My book – Rethinking Digital Photography
Read more about Pinhole Photography and other great photographic techniques in my book Rethinking Digital Photography.
NOTICE of Copyright: THIS POSTING AS WELL AS ALL PHOTOGRAPHS, GALLERY IMAGES, AND ILLUSTRATIONS ARE COPYRIGHT © JOHN NEEL AND ARE NOT TO BE USED FOR ANY PURPOSE WITHOUT WRITTEN CONSENT FROM THE WRITER, THE PHOTOGRAPHER AND/OR lensgarden.com. THE IDEAS EXPRESSED ARE THE PROPERTY OF THE PHOTOGRAPHER AND THE AUTHOR.
