

Part 7 – Install Pinhole

pinhole assembly
This is the seventh of a number of posts that will be devoted to the construction and the use of my 120 Matchbox Pinhole Camera.
PLEASE READ! – As this is a learn-as-I-go project, I will not post this as a single post tutorial. I am showing you my progress in the hopes of getting you interested in the building process. In the end, you can follow through the links that will show you the complete step-by-step build. To see previous posts use the links below.
Here is where I am at the moment with Part 7:
In the last post, we created our pinhole. In this post, we will attach it to the inside front of the matchbox Cover (sleeve).

Image A – X marks the center of the front
Image A – If you haven’t done so, use a straight edge to find the center of the front surface of the matchbox by drawing a line from opposite corners to. Mark it with an X. Cut out an opening that is smaller than your pinhole plate. I would suggest a 1/2 inch circle or smaller.
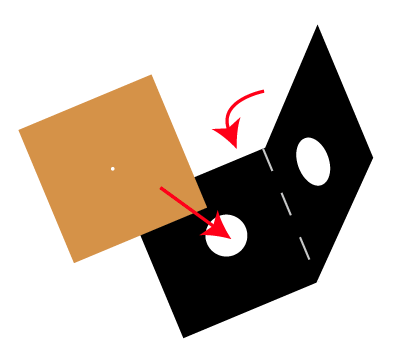
Image B – Insert pinhole plate into fold
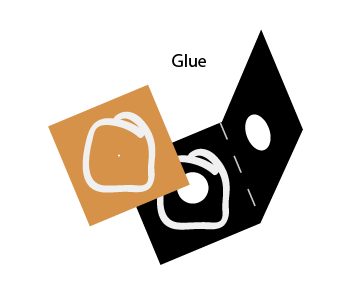
Image C1 – Glue together
Image B – Cut out a 1″x 2″ piece of black construction paper. Fold it in half to create a 1″x 1″ fold.
Using a hole punch, punch a hole through the center of the folded paper.
In order to avoid the plate from becoming dislodged when we assemble the camera. The pinhole plate should be sandwiched between the folded paper. Center the pinhole in the punched opening.
Image C1 and C2 – Trim the outside edges of the pinhole plate that might be protruding and glue the layers together. Avoid getting glue on or near the actual pinhole. Let it dry completely before you proceed to the next step.
Image C2 – Pinhole assembly
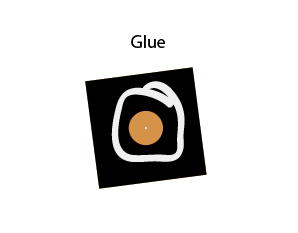
Image D – Glue into place
Image D – Using a small amount of white glue, glue the completed pinhole assembly behind the opening in the matchbox. Make sure that the pinhole is centered in the opening. Let this dry completely before performing any further steps.
In the next post, we will attach the shutter we made in 120 Matchbox Pinhole Project – Part 5 – Shutter.
There are only a few simple steps to go. Soon, we’ll be taking some pictures.
Previous Posts:
120 Matchbox Pinhole Project – Part 1
120 Matchbox Pinhole Project – Part 2
120 Matchbox Pinhole Project – Part 3
120 Matchbox Pinhole Project – Part 4
120 Matchbox Pinhole Project – Part 5 – Shutter
120 Matchbox Pinhole Project – Part 6 – Pinhole

Rethinking Digital Photography – John Neel
Read more about Pinhole Photography and other great photographic techniques in my book Rethinking Digital Photography.
NOTICE of Copyright: THIS POSTING AS WELL AS ALL PHOTOGRAPHS, GALLERY IMAGES, AND ILLUSTRATIONS ARE COPYRIGHT © JOHN NEEL AND ARE NOT TO BE USED FOR ANY PURPOSE WITHOUT WRITTEN CONSENT FROM THE WRITER, THE PHOTOGRAPHER AND/OR lensgarden.com. THE IDEAS EXPRESSED ARE THE PROPERTY OF THE PHOTOGRAPHER AND THE AUTHOR.
