

This is the tenth of a number of posts devoted to the construction and the use of my 120 Matchbox Pinhole Camera.
In this post, we will load the film and assemble the remaining components.
Note: The images below presume that the shutter and pinhole are already in place as per the previous postings – Part 7 and Part 8.
You can go back to any of the previous 120 Matchbox Project posts using the links below.
120 Matchbox Pinhole Project – Part 10 – Assembly
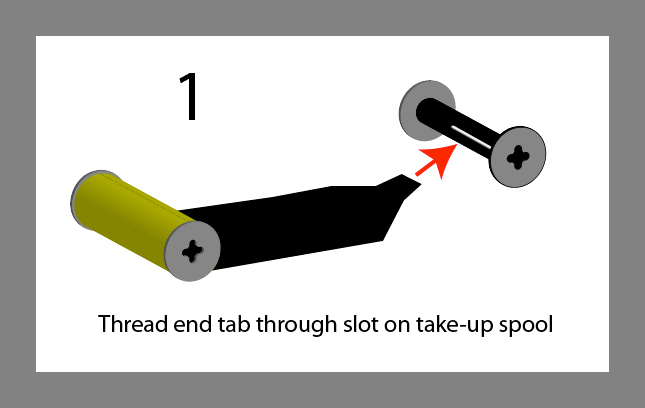
Step 1 – Film Spool
Step 1 – After removing the band from the 120-film roll, thread the leader of the baking paper through the take-up spool. I hold the fresh film spool in my left hand and the take-up spool in my right hand.
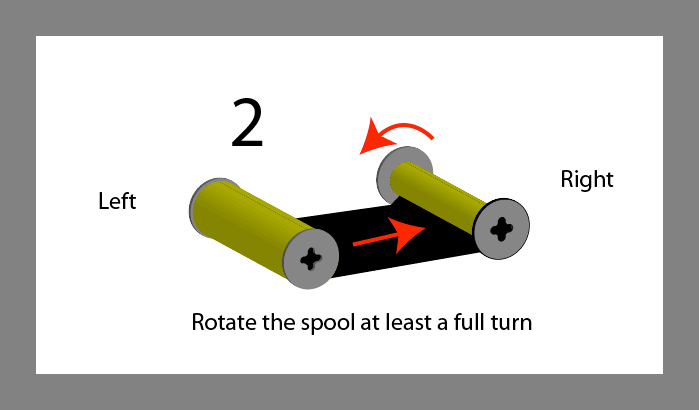
Step 2 – Winding On
Step 2 – Wind the leader onto the take-up spool for at least one full turn. It is important that the roll winds on tightly and is centered on the spool.
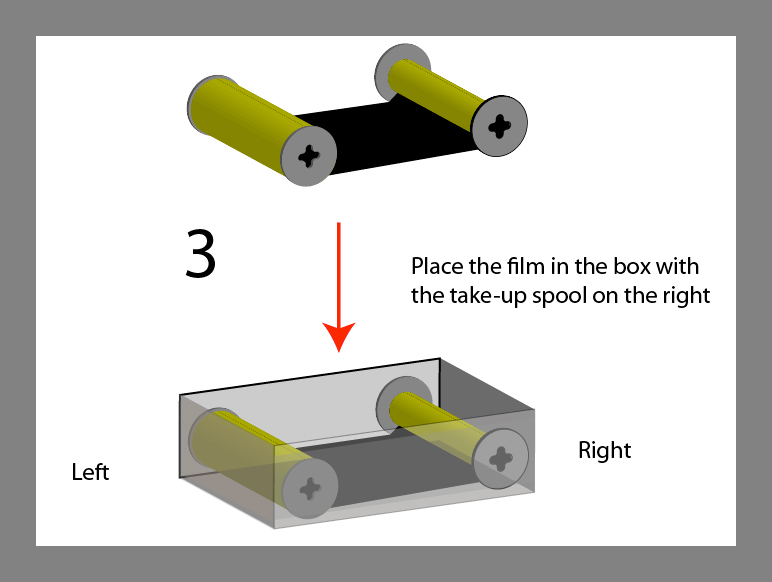
Step 3 – Place in Box
Step 3 – Position the film into the inner box (film chamber) with the new roll spool on the left and the take-up spool on the right. The black side of the paper should be facing upwards.
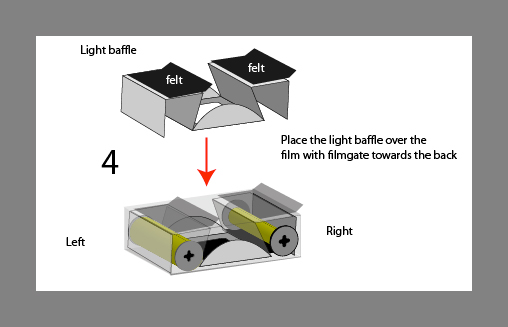
Step 4 – Insert Baffle
Step 4 – Insert the light baffle/film support/guide into the film chamber. Make sure that the felt is trailing to the right and the two ends are tucked between the film spools and the box ends. As you push, the felt should be pushed flat and fill in the spaces where light might enter the camera.
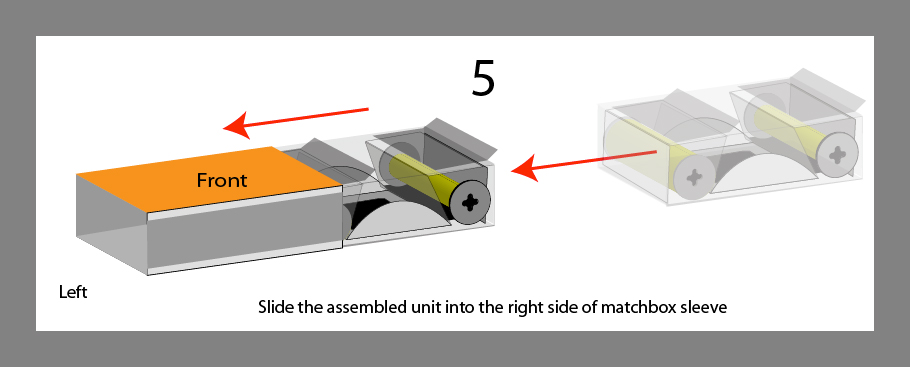
Step 5 – Slide Internal Unit Into Sleeve
Step 5 – Insert the inner box into the outer sleeve by pushing it into the right side of the sleeve. Gently squeeze the sides of the sleeve so that the top bows slightly as you push. This allows the pinhole to rise up slightly and should make the loading easier. Doing this will keep the pinhole mount from snagging.

Internal Assembly Completed – Mark Push
Step 6 – This shows the completion of the internal components. Using a marker, I usually mark the right end of the camera with the word – PUSH. This will help when it comes time to unload the camera.
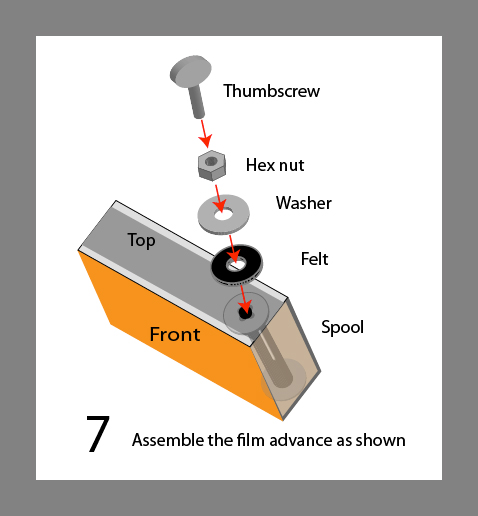
Winder Assembly
Step 7 – Roll the camera so that the top is facing upwards. Assemble the thumbscrew, hex nut, washer, and felt washer as shown. Locate the hole on the right side. Carefully screw the end of the thumbscrew clockwise into the end of the film spool. You only need to start it enough that it will be able to turn the spool to advance the film. Snug th ehex nut down just so it keeps the washers close to the box top. This helps with any light leakage through the opening.
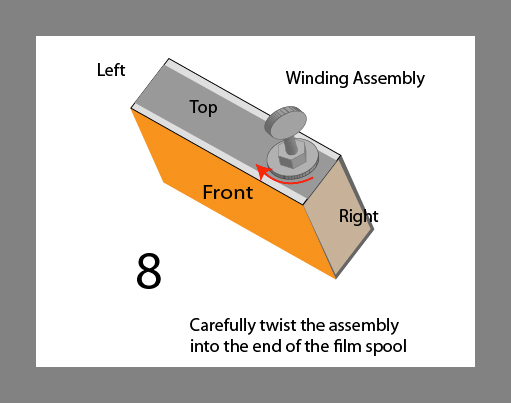
Completed Assembly
Step 8 – Assuming you have already attached the pinhole correctly as well as the shutter, the camera should be just about ready to use. Mark a spot on the camera next to the film advance that will act as an index mark for each revolution of the winder. I would also suggest that you mark the turning direction with an arrow by drawing an clockwise arrow on the surface of the box or the metal washer.
Before taking any pictures, you will need to advance the film through the camera to the point where the actual film begins. Make sure that the pinhole shutter is in the covered position. Turn the thumbscrew clockwise approximately eight full turns. This should be where the first frame is centered in the film gate.
In the next post, we will discuss the use of the camera and how to take pictures with it.
Links to previous Matchbox Pinhole Camera posts:
120 Matchbox Pinhole Project – Part 1
120 Matchbox Pinhole Project – Part 2
120 Matchbox Pinhole Project – Part 3
120 Matchbox Pinhole Project – Part 4
120 Matchbox Pinhole Project – Part 5 – Shutter
120 Matchbox Pinhole Project – Part 6 – Pinhole
120 Matchbox Pinhole Project – Part 7 – Install Pinhole
120 Matchbox Pinhole Project – Part 8 – Pinhole and Shutter Install
120 Matchbox Pinhole Project – Part 9 – The Film
Read more about Pinhole Photography and other great photographic techniques in my book Rethinking Digital Photography.
NOTICE of Copyright: THIS POSTING AS WELL AS ALL PHOTOGRAPHS, GALLERY IMAGES, AND ILLUSTRATIONS ARE COPYRIGHT © JOHN NEEL AND ARE NOT TO BE USED FOR ANY PURPOSE WITHOUT WRITTEN CONSENT FROM THE WRITER, THE PHOTOGRAPHER AND/OR lensgarden.com. THE IDEAS EXPRESSED ARE THE PROPERTY OF THE PHOTOGRAPHER AND THE AUTHOR.
